KIT724-Assignment 5 Report-Group16
“Industry Star” AR Application
1. Introduction
Based on the last vision of “Industry Star”, some functions and technical interactions are improved, implemented, tested and modified, including the running conveyor belts; text description and video demonstration of each workshop; check production equipment details through magnifying, minifying and rotating production equipment (see Figure 1).
The AR technology, 3D models and interaction designs make the application not only attractive but functional and practical in business situations, it could display the manufacturing process, structures, production and equipment details to potential investors and customers.
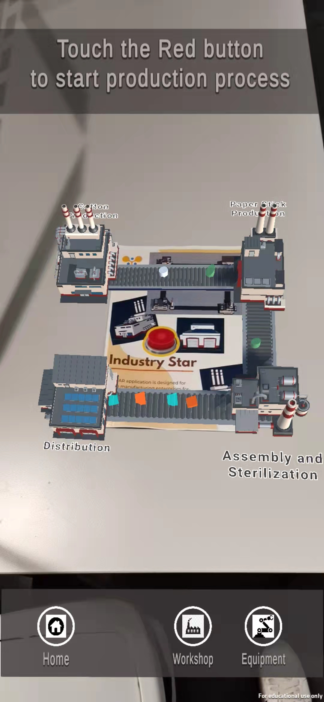
Figure 1. A screenshot of the "Industry Star" Application.
2. Technical Development
“Industry Star” is developed by the software Unity (3D) with Vuforia engine, built and tested on AR mobile phone Google Pixel 3a. To carry out designed interactions, the AR camera, virtual button, image target, 3D models, UI and multiple scripts are applied in this application.
The home page of the application is shown in Figure 2, there are three buttons on the interface. When the user clicks on the “Scan to Start” button, the application will change to the second screen, the code in Figure 3 is the key script to change the scene. When the user clicks on the “About” button, a text description about this application will pop up as shown in Figure 4, an empty game object is used to realize this function. The script in Figure 5 is applied to the “Quit” button to quit the application and return to the mobile phone screen.
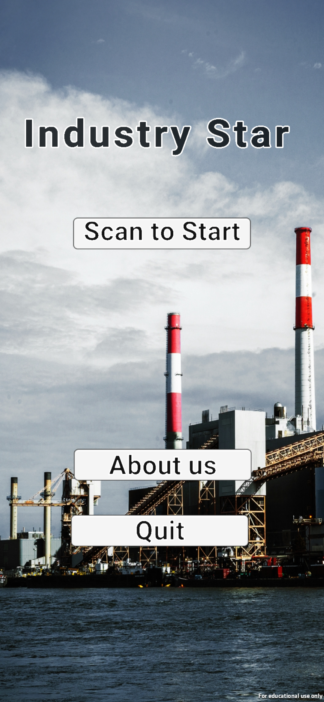
Figure 2. A screenshot of the "Home" page.  Figure 3. Script of change scenes.
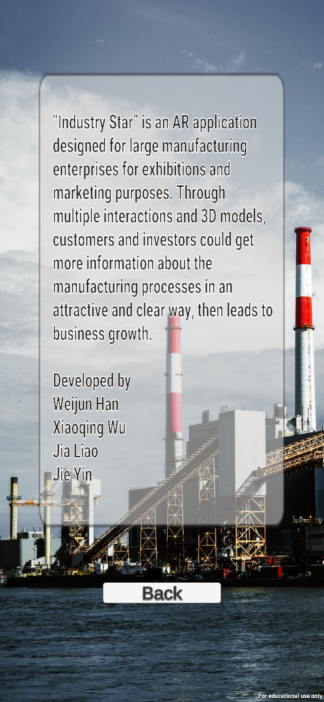
Figure 4. A screenshot of the "About" page.

Figure 5. Script of quitting the app.
Figure 6 is the main page, the poster is the image target, and there is a virtual button in the middle of the page and three UI buttons at the bottom of the page. When the user scans the poster with cameras, the 3D models of four workshops and conveyor belts will show up. The demo project aims to show the cotton swabs manufacturing industry, the four workshops are “Cotton Production”, “Paper Stick Production”, “Assembly and Sterilization”, and “Distribution”. When the user touches the red button on the poster, some 3D models present manufacturing materials and products will appear on the belts. They will run with the belts and be transferred between different workshops. The script applied on conveyor belts is shown in Figure 7. If the user clicks on the “Home”, “Workshop” or “Equipment” buttons, the user will be led to the equivalent screens.
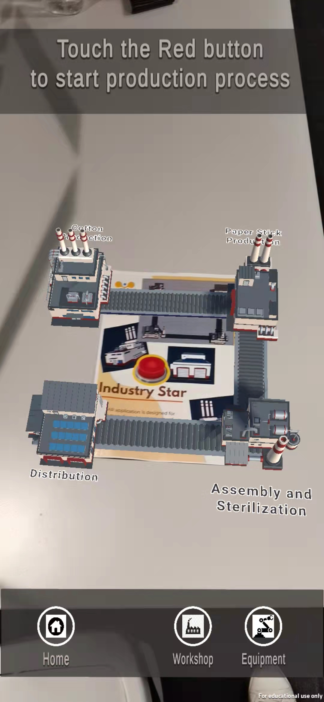
Figure 6. A screenshot of the "Main" page.

Figure 7. Script applied on the conveyor belts.
Figure 8 shows the workshop page, the 3D model of the first workshop “Cotton Production” and the workshop’s 3D modal will display on the screen by default. The “Main” button can bring the screen back to the main page mentioned above. Users can switch between the four workshops by clicking the buttons, this function is achieved by the script shown in Figure 9. There is a small menu with three buttons on the right of the screen, which are three interactions with the 3D model. By pressing the first button (rotate icon), the 3D model will rotate in a clockwise direction, click the button again, and it will stop. This is done by the transform component and script in Figure 10. By pressing the second button (text icon), the user can check the text description of the workshop. By pressing the third button (video icon), a short video of what is happening inside the workshop, the actual production process, will display. To activate and close the UI frame, the script in Figure 11 is applied to the buttons. That is all about the factory page.
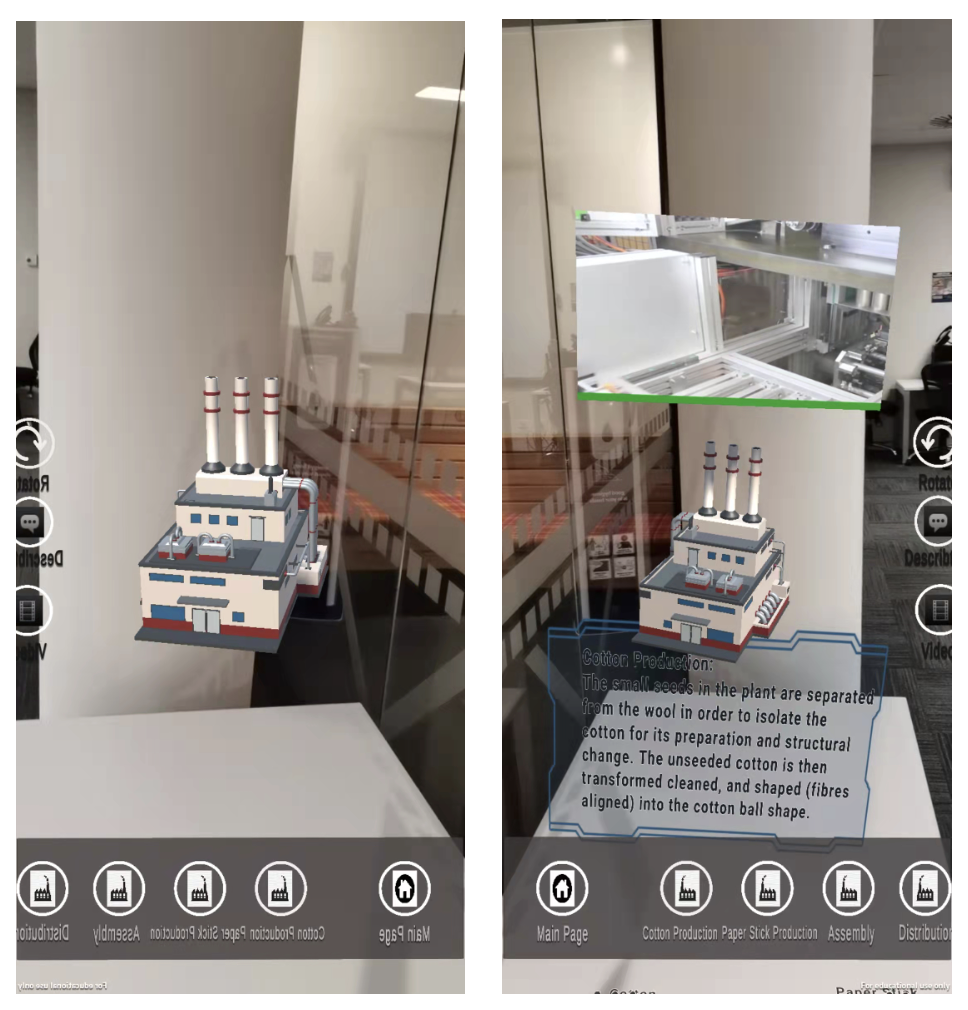
Figure 8. A screenshot of the "workshop" page.
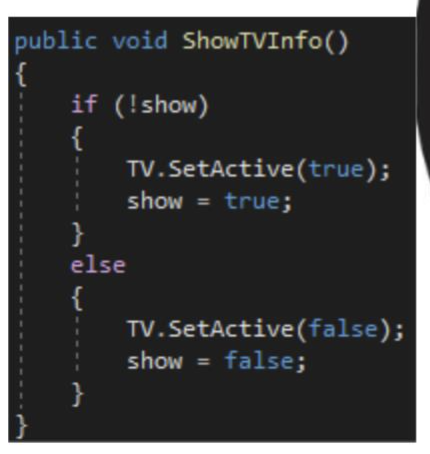
Figure 9. Script applied on the button of the "Workshop" page.
 Figure 10. Script of rotating 3D models.
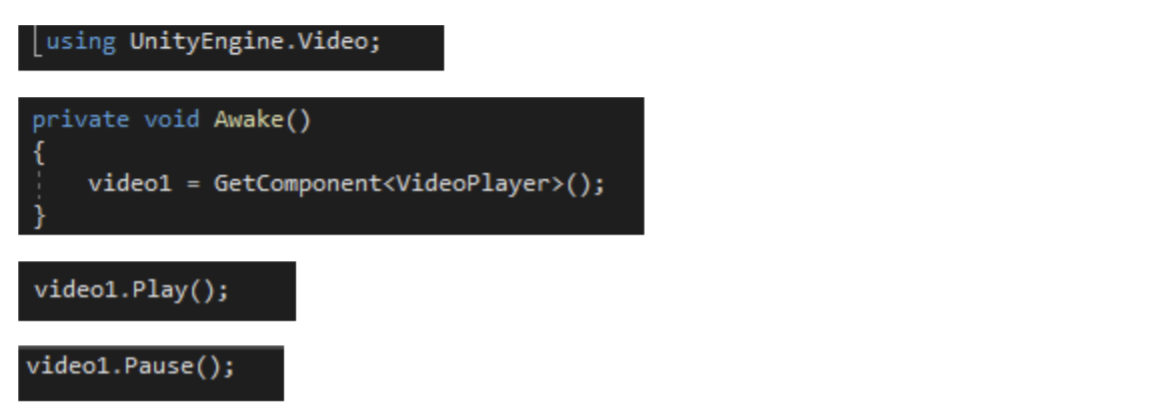
Figure 11. Script of playing video.
From the factory page, we can go back to the main page by pressing the “Main” button and go to the equipment page by pressing the “Equipment” button. The equipment are the key ones in the production process. Figure 12 is a screenshot of this page. There are three equipment in this demo project, which are the Robotic Arm, Laser Cutter and CNC Vertical. In this scene, the user can scan the image target, and the 3D model of the targeted equipment will show up. Again, there are five UI buttons on the bottom of the screen, the first one is “Main” which can go back to the main page. The second and third buttons are “Zoom in” and “Zoom out”, users can magnify and minify the model to check the details of the huge equipment. This function is carried out by the script in Figure 13. The last two buttons are “Rotated” and “Description” which are similar to the factory page. By pressing them, the user can rotate the 3D model and check the text description about the equipment.
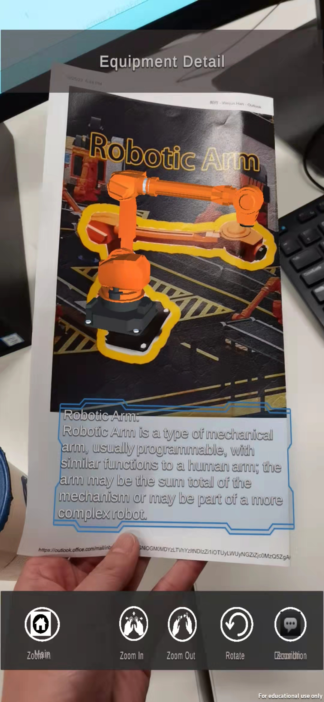
Figure 12. A screenshot of the "Equipment" page.

Figure 13. Script of zooming in and out.
3. 3D Content
In the demo project, there are three types of 3D models, which are four workshops and conveyor belts (see Figure 14), cylinders and cubes on the belts (see Figure 15), and three equipments (see Figure 16).
The four workshop models are used to visualise the main production plants involved in the manufacturing process, the conveyor belts indicate the connections between them, the cylinders represent materials, and the cubes are finished goods. With these 3D models, the actual production procedures, from raw material, to production to distribution, are displayed to users clearly and vividly. Most of the large manufacturing enterprises use a lot of huge equipment, it is not easy to have an overview and details of them together, through these 3D models in Figure 16, it is more visual, convenient and efficient to investigate them.
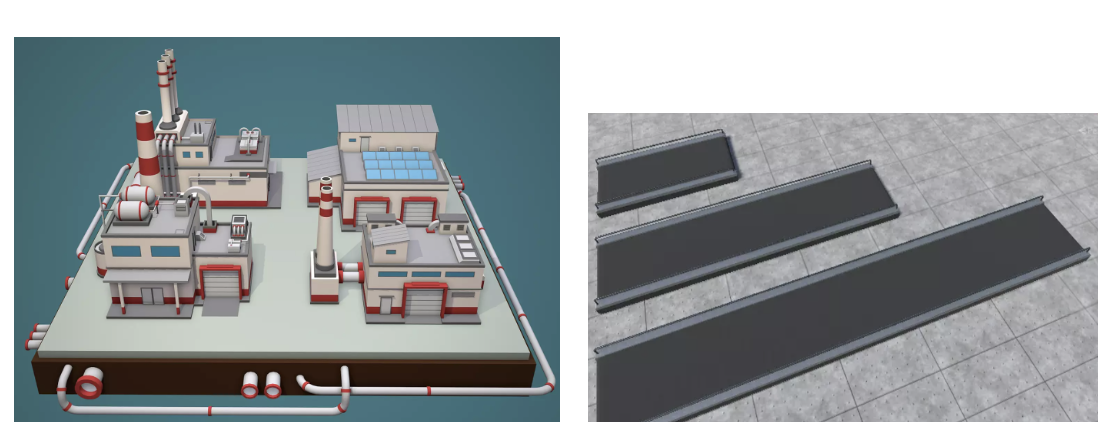
Figure 14. 3D models of the four workshops and belts.
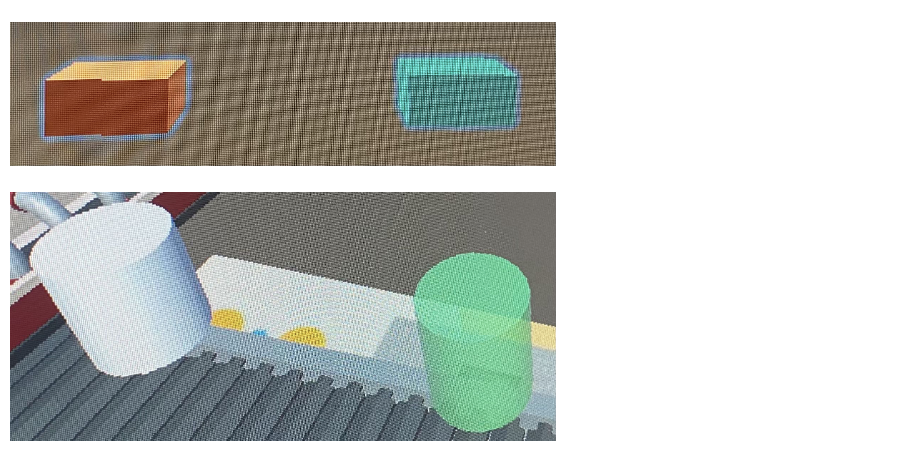 Figure 15. 3D models of materials and products.
 Figure 16. 3D models of the three equipment.
4. Usability Testing
Usability testing is a type of controlled setting, which is a key component of good practice in the development of digital applications. It assesses the completeness and user-friendliness of the software through typical operations performed by a representative group of users or professional applications. (Maramba et al. 2019).
4.1 Design and plan
A Likert-scale questionnaire with six questions and five open-ended questions was designed as a test method, with testers providing trial feedback via Google form web questionnaire (Figure 17), while interviews will also be introduced after the tester has completed the website questionnaire. A further individual interview will be conducted to explain the details if necessary.
Remote testing for testers with an Android phone, and face-to-face testing for those without at the University of Tasmania Sunshine Bay Campus Lab 139 room.
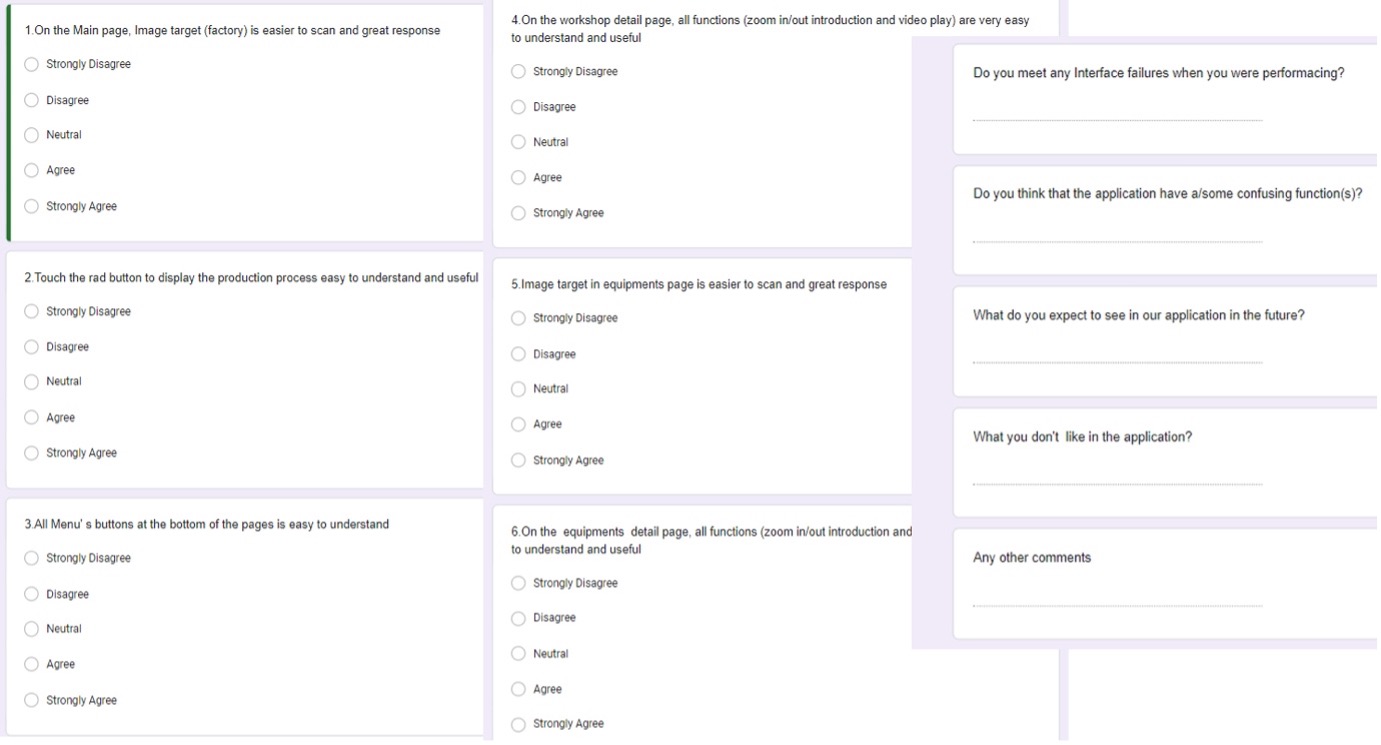
Figure 17. Google questionnaire.
4.2 Recruitment
We invited testers from various platforms including Facebook, WhatsApp, WeChat and face-to-face tutorial students. For this evaluation, we selected ten testers based on different genders, ages and backgrounds. the participant's information is recorded in Table 1 below.
The goal is to test whether each function of our application is available Before the test, we will give participants a simple introduction to the application use process. It takes about 20 minutes to complete the test and feedback. The final list of 10 testers we selected is as follows table:
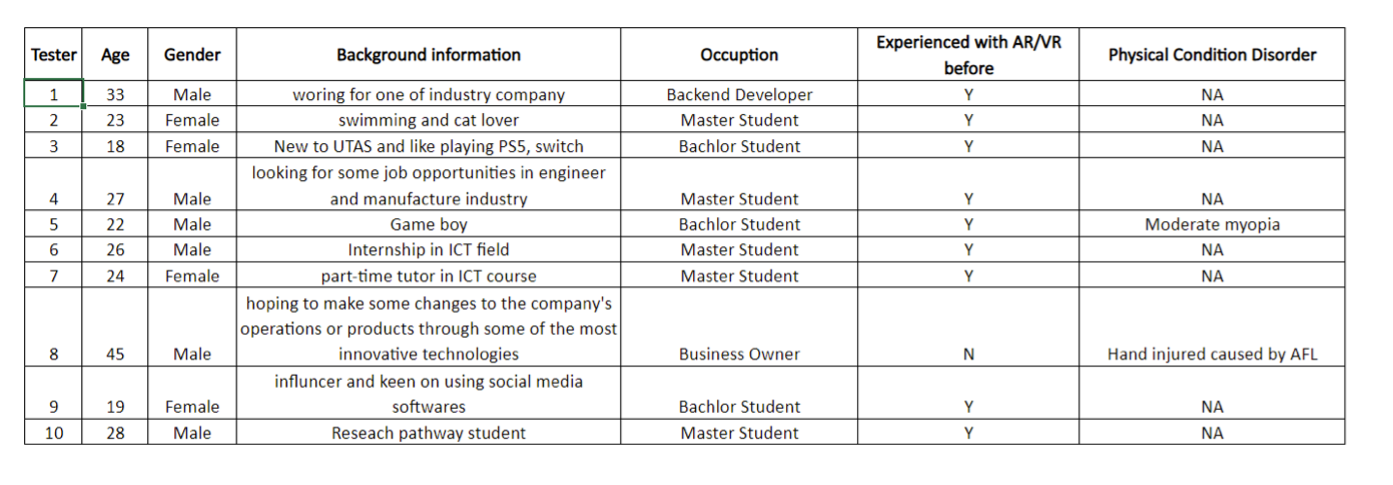
Table1. Tester list.
4.3 Protocol of the testing
During testing, face-to-face testers will be accompanied by a member of our team but will not interfere with the testers' actions until they have asked for help. For remote testers, we will keep in touch with them.
Before the test start, we will introduce them to a mobile app testing task that they need to complete.
1) The whole process will take approximately 20 minutes.
2) They will be introduced to the four pages they will be testing: the home page, the main page, the workshop details page and the device details page and the main functionality of each page.
3) After the test they will be asked to fill in a questionnaire and give feedback to rate the overall aesthetics and usability of the page.
4) Explain if they encountered any invalid buttons or unintended responses.
5) Explain if there are any unclear designs for the buttons and icons.
6) Explain if there are any possible improvements.
7) Inform the ethics statement.
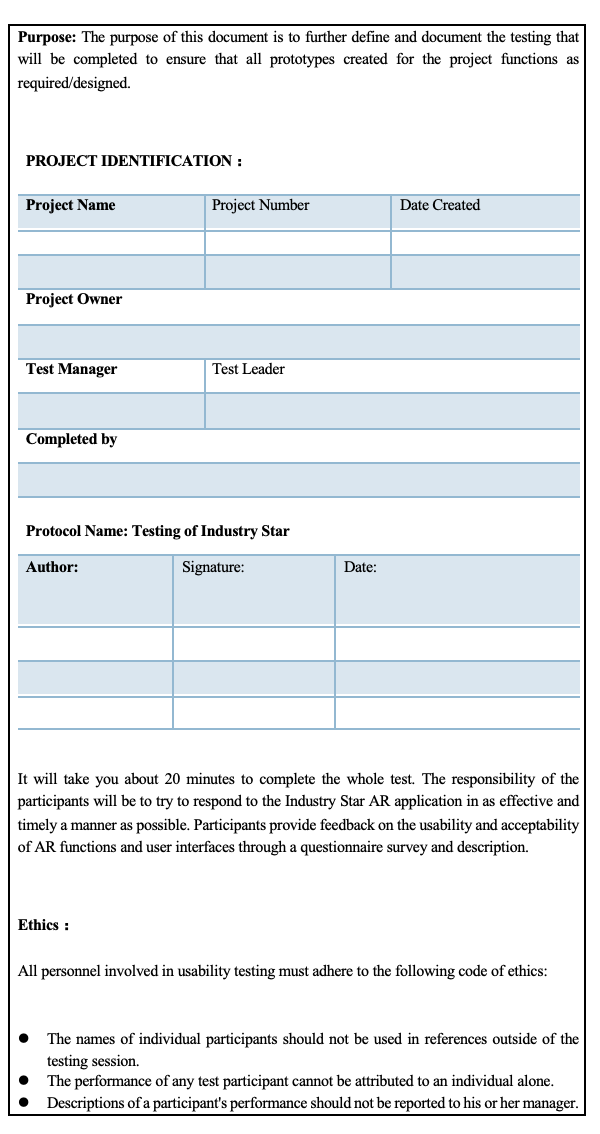
Table 2. Protocol.
4.4 Report of the findings.
The test results are summarized as follows in two tables:
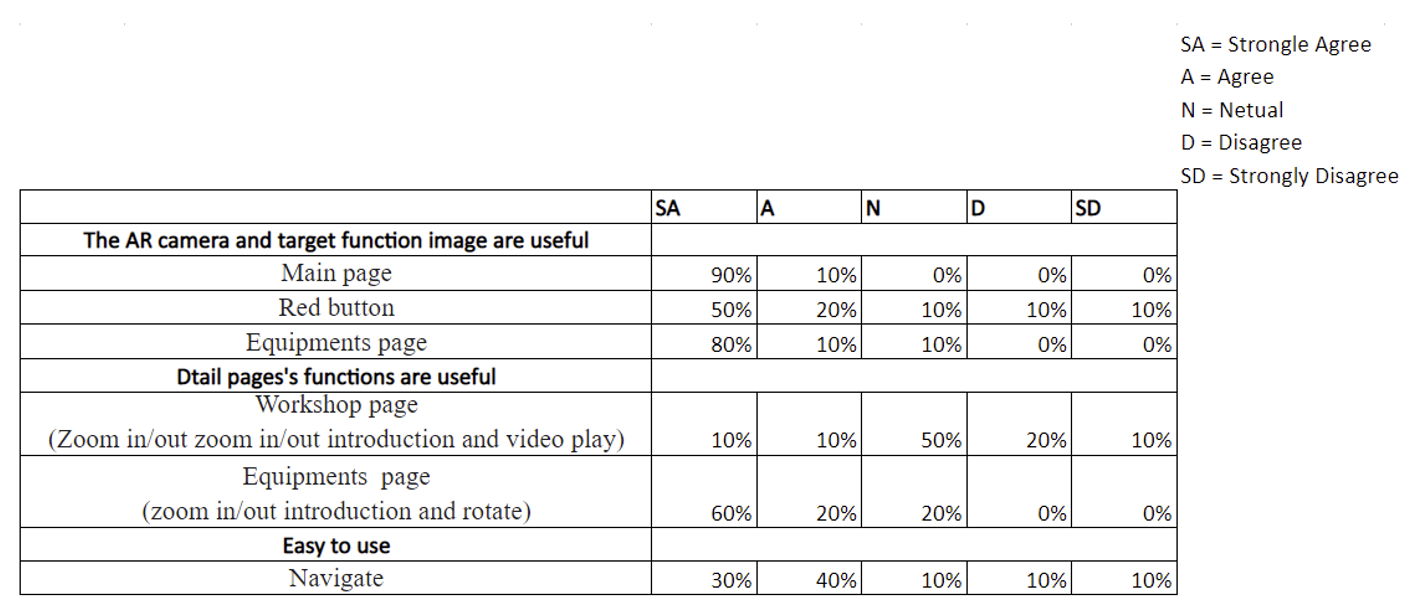
Table 3. The questionnaire quantitative survey results.
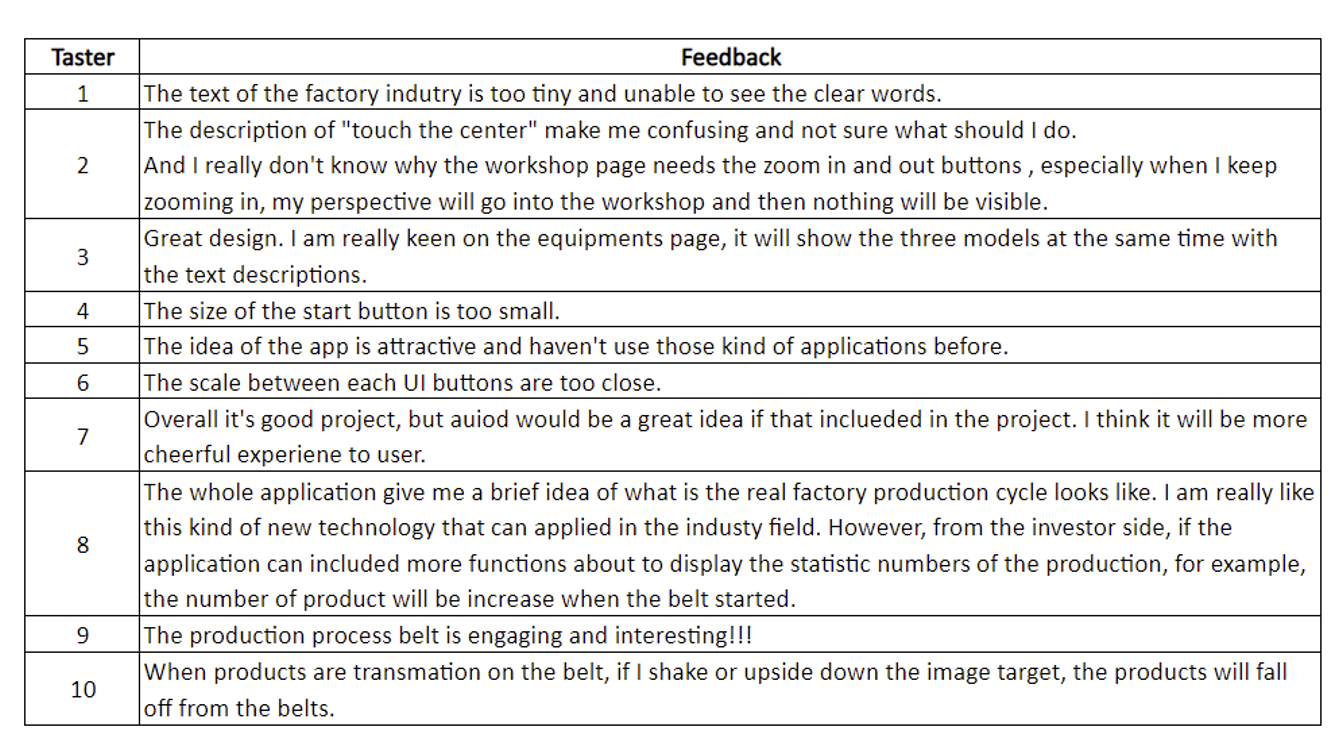
Table3. Tester feedback.
4.5 Analyses of the findings.
Overall, all AR target image scanning functions and UI functions are working well. The interactive 3D model combined with reality is really attractive and exciting. The part that can be improved proposed by the tester mainly focuses on aesthetics and the role or significance of functions.
5. Addressing the results of the usability testing.
After receiving feedback from users, we iterated on the design of the project interface and modified it as follows:
1) A big red button is added on the centre of the target image of the main page to instruct users to touch it.
2) The addition of Collider barriers around belts to prevent goods from falling off from the conveyor belt when shaking the image target.
3) Redesigned the UI, replacing the buttons with text with prototype images and displaying the function text below.
4) Cancels the zoom-in and zoom-out function of the workshop page, and only retain the zoom-in and zoom-out function on the equipment page.
5) Enlarged and bolded the font size of the introductions.
6) Redesigned the UI buttons, replacing the text buttons with circular images and displaying the name of the corresponding function below.
7) The ability to connect to the database and display inventory in real-time is planned for the next release.
6. References
Maramba, I., Chatterjee, A. and Newman, C., 2019. Methods of usability testing in the development of eHealth applications: a scoping review. International journal of medical informatics, 126, pp.95-104.
Main page background image: https://unsplash.com/photos/9GwMIek9jnY
Production process description: http://www.designlife-cycle.com/cotton-swabs
3D models:
Conveyor belt: https://assetstore.unity.com/packages/tools/physics/procedural-conveyor-system-w...
Equipment: https://assetstore.unity.com/packages/3d/environments/industrial/megapoly-art-me...
Scripts:
Text Panel and model display:
Model zoom-in and zoom-out:
Change scene:
Menu page control:
Videos of the workshops:
Files
Get KIT 724-Assignment 4 Report- Group 16
KIT 724-Assignment 4 Report- Group 16
More posts
- KIT724 Assignment4 -Report-Group16Oct 09, 2022
Leave a comment
Log in with itch.io to leave a comment.